a working pentest for dummies in a little box!
Stumbled across a neat little project on Reddit the other day and I liked it so much I wanted to share!
![]()
Pentesting is something I’ve been doing for many years, and although a lot can be automated – much is manual work. That’s how I do it anyway, and that has always given me full control and the ability to act upon whatever I find throughout the session. The user secgroundzero decided to make a “fire and forget” type installation where you sneakily connect a little box to any available RJ45 ethernet port, it’ll automatically run all the tests you want and you can later collect the little box when you think it’s ready. He decided to use a Raspberry Pi for this little project, and he’s done a great job if you ask me!
The bulk of the operation is based around the most common tools for pentesting and a python script that runs these and collects the data in an orderly fashion, but you can easily add your own stuff or just play around with the configuration. There are also recommendations for post-run analysis tools and I think the collection is a really good one!
Currently there are no images which you can download so you have to build your own and install all the resources, so in order to make it a proper “for dummies”, I’ve made a script for you! 😉
Depending on your distro you might run into errors I can’t predict, but my example is based on Debian Jessie Lite, which is a headless Debian distro for Raspberry Pi, and this is all you need to get started.
Download the latest Debian Jessie Lite (download full version if you need X for some reason…)
https://downloads.raspberrypi.org/raspbian_lite_latest
and put it on the sdcard. (my example is using /dev/mmcblk0 but use whatever dev your sdcard is connected to)
sudo dd bs=4M if=2016-05-10-raspian-jessie-lite.img of=/dev/mmcblk0
Put the sdcard in your Rasberry Pi (called raspi that hereafter), boot and do the usual config like expand sdcard, set hostname and auto login.
Reboot the raspi and connect with ssh. Default user is “pi” and password “raspberry”
First some housekeeping by updating to the latest and greatest patches.
sudo apt-get update; sudo apt-get upgrade
If you for some reason encounter this problem during upgrade:
dpkg: error processing package bluez (–configure):
subprocess installed post-installation script returned error exit status 1
Errors were encountered while processing:
bluez
E: Sub-process /usr/bin/dpkg returned an error code (1)
just run ‘sudo apt-get remove -y bluez bluez-firmware‘ and you’re done. You don’t need Bluetooth for this little project anyway.
Now you’re ready to start the installation.
Note. When installing macchanger you have to choose to automatically set a new MAC every reboot. For home tinkering select no, for “live” use, select yes.
Just copy & paste the script below into the terminal which you’ve connected to the raspi with ssh and grab a coffee!
cd /home/pi
mkdir WarBerry
cd WarBerry
mkdir Results
mkdir Tools
git clone https://github.com/secgroundzero/warberry.git
sudo apt-get install -y git nbtscan python-scapy tcpdump nmap python-pip
sudo apt-get install python-bluez
sudo pip install python-nmap
sudo pip install ipaddress
sudo pip install netaddr
sudo apt-get install -y ppp sg3-utils netdiscover
sudo apt-get install macchanger
cd Tools
git clone https://github.com/DanMcInerney/net-creds.git
sudo apt-get install -y onesixtyone nikto hydra john w3af-console ettercap-text-only
git clone https://github.com/stasinopoulos/commix.git
git clone https://github.com/sqlmapproject/sqlmap.git
git clone https://github.com/CoreSecurity/impacket.git
git clone https://github.com/samratashok/nishang.git
git clone https://github.com/SpiderLabs/Responder.git
git clone https://github.com/sophron/wifiphisher.git
git clone https://github.com/Dionach/CMSmap.git
git clone https://github.com/PowerShellMafia/PowerSploit.git
sudo apt-get -y install libssl-dev
wget http://download.aircrack-ng.org/aircrack-ng-1.2-beta1.tar.gz
tar -zxvf aircrack-ng-1.2-beta1.tar.gz
cd aircrack-ng-1.2-beta1
sudo make
sudo make install
sudo airodump-ng-oui-update
sudo apt-get -y install iw
wget https://download.sysinternals.com/files/SysinternalsSuite.zip
cd /home/pi
sudo chown -R pi:pi WarBerry
And that’s it – you’re done! You can now ‘cd WarBerry/warberry‘ and then start everything with ‘sudo python warberry.py -A‘ and then just sit back and watch the results!
If something broke, look at the error code and act accordingly, but if you use a freshly installed Debian Jessie Lite then you should be fine. (although later revisions might be faulty, and I take no responsibility for anything that goes wrong…)

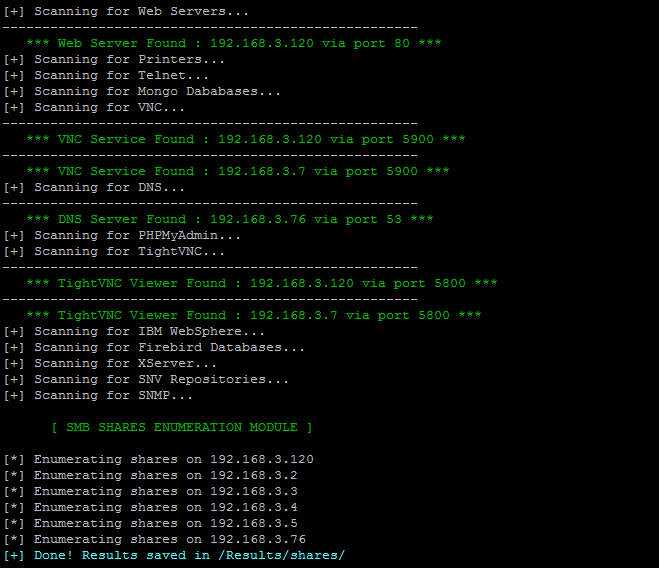
All results are stored in ‘Warberry/Results’ which you created in the beginning and consecutive runs will be appended to these files.
This can obviously be used for sinister activities, and such is life… Myself have other interests in the matter and I like it for the simple automated tool it is! One great use for the WarBerryPi is to secure your home network and computers!
What can be done to further improve the WarBerry after this? Well, you can either add a cron job that starts warberry.py -A or you can connect a button on the GPIO that starts the same when you press that button.
All the credits for creating the WarBerryPi project goes to secgroundzero which can be found at https://github.com/secgroundzero/warberry – and perhaps a tiny bit of credit to me for creating the install script so you don’t have to do install everything manually, or if you simply don’t know how to do this in Debian linux…
Don’t do anything stupid with this, just because you can… On the other hand, the WarBerryPi won’t give you anything unless you actually know what you’re doing, so if you have zero skills in netsec then this tool won’t do you any good regardless.
Please leave a comment below if you found this instruction/script useful and if you have any ideas for improvement, or something didn’t work.
June 11, 2016
Hi, I hope you can help me. After all the instalation, when I’m going to execute it I’m facing an error on Raspeberry pi 3.
Traceback (most recent call last):
File “warberry.py”, line 48, in
from bluetoth import *
ImportError: No mudule named bluetoth
I’m trying to delete the line but I cannot write on the script I have. Please help me with that.
June 11, 2016
Run this command to install bluez in case it’s not installed. “sudo apt-get install python-bluez”
The WarBerry Pi repository has probably changed a bit since I wrote my blog and I’ll update it in case it needs to…
Please let me know if this solved your problem, and if not I’ll help you.
If it didn’t solve the problem, please run “python -V” so I know if you’re running python2 or python3.
June 11, 2016
Hi, it worked but I had to remove the bluetooth option and else on executing the warberry. pi without the option -A
June 11, 2016
So, if I understand you correctly, you are unable to run “sudo python warberry.py -A” if you have bluetooth installed?
If that’s the case I’ll check what’s been changed in the WarBerry source and we’ll figure out how to remove the Bluetooth requirement…
June 11, 2016
Let me explain again, sorry.
I used this command sudo apt-get remove -y bluez bluez-firmware‘ and then I executed this command ‘sudo python warberry.py -A‘ but giving an error saying to execute without -A so I used ‘sudo python warberry.py’ and everything worked.
June 11, 2016
Ok, I see your problem and this is because Bluetooth support is hardcoded into warberry.py
https://github.com/JensAndree/warberry/blob/master/warberry.py
You can try to download this from my github where I quickly commented out the Bluetooth parts – but I’ve not tested it, just made the change. I’m currently in the garden doing this on my Android phone so I can’t test it for real, but I can do so later tonight… 😉
June 11, 2016
Ok thank you, my phyton version is 2.7.9
Not so sure why the options -a is not working but I will talk to u lter. Enjoy ur day.
June 11, 2016
Hi, I have another question? If I update the version of raspbian for the full version, do I have to do everything again? if not how do I do that. I got the results so how can visualise it? Thank u very much
June 11, 2016
You can install X and everything else manually with apt-get and you won’t lose anything you’ve installed prior, but it might be easier to download the full raspian image and start from scratch since it’s quite a lot they have omitted in the lite image…
Happy tinkering!!!
July 5, 2016
I also notice that the RESULTS piece is not covered here, have you used it or gotten it to work? I have been playing with it but not 100% sure how exactly to make it work. Any ideas or direction?
July 4, 2016
Question for you I was able to replicate the same thing as the above use with the Raspberry Pi Zero V1.
I am able to get WarBerry installed and everything setup but for me to run an attack I just use sudo python warberry.py. NO -a. I’m not sure why that is all the other – parameters seem to work accept the -A or -a. I also trieed the –attack-me and –attack and those don’t work either any suggestions?
July 5, 2016
I haven’t checked the latest branch in a couple of weeks since I made my own fork of the project quite a long time ago, and my version is lagging behind at the moment…
I do seem to remember the parameters were changed somewhat and that you no longer needed the “-A” when running warberry.
I see that they have made some examples on how to run the tool in its various modes and features. Check it out. It might be of some help?
https://github.com/secgroundzero/warberry/wiki/examples
The results are just stored in a bunch of text files but they do require that you understand what’s in them because you will not get a prettified results document at the end of each run – just the details for each IP address.
Let me know if you still can’t run warberry after checking the examples and meanwhile I will try to merge the latest changes into my fork. (my fork is without Bluetooth and a few other extra features that Warberry Pi doesn’t have.)
May 26, 2017
Hi,
Thanks for this post.
I’ve done all those steps, on Raspberry 3, but I get the message :
Traceback (most recent call last):
File “warberry.py”, line 50, in
from src.core.scanners.targetted_scanner import *
File “/home/pi/WarBerry/warberry/src/core/scanners/targetted_scanner.py”, line 26, in
from src.core.enumeration.services_enum import *
File “/home/pi/WarBerry/warberry/src/core/enumeration/services_enum.py”, line 17, in
import subprocess32
ImportError: No module named subprocess32
Some ideas?
Thanks.
Neil.
May 26, 2017
It looks like you don’t have the module subprocess32 installed.
Try “pip install subprocess32” and try again.
You might get further module errors and use the same method for loading any other missing modules until it runs without errors.
If this doesn’t work then please let me know and I’ll try to help you!
Python sadly can’t auto-load modules on the fly and this is a common trap for those who are just learning python.
May 27, 2017
Hi,
Thanks for your fast response.
I try and I get this
Downloading/unpacking subprocess32
Downloading subprocess32-3.2.7.tar.gz (54kB): 54kB downloaded
Running setup.py (path:/tmp/pip-build-_4oMAc/subprocess32/setup.py) egg_info for package subprocess32
warning: no files found matching ‘*.h’
no previously-included directories found matching ‘build’
no previously-included directories found matching ‘dist’
no previously-included directories found matching ‘.hg*’
Installing collected packages: subprocess32
Running setup.py install for subprocess32
building ‘_posixsubprocess’ extension
arm-linux-gnueabihf-gcc -pthread -DNDEBUG -g -fwrapv -O2 -Wall -Wstrict-prototypes -fno-strict-aliasing -D_FORTIFY_SOURCE=2 -g -fstack-protector-strong -Wformat -Werror=format-security -fPIC -I/usr/include/python2.7 -c _posixsubprocess.c -o build/temp.linux-armv7l-2.7/_posixsubprocess.o
_posixsubprocess.c:3:20: fatal error: Python.h: No such file or directory
#include “Python.h”
^
compilation terminated.
error: command ‘arm-linux-gnueabihf-gcc’ failed with exit status 1
Complete output from command /usr/bin/python -c “import setuptools, tokenize;__file__=’/tmp/pip-build-_4oMAc/subprocess32/setup.py’;exec(compile(getattr(tokenize, ‘open’, open)(__file__).read().replace(‘\r\n’, ‘\n’), __file__, ‘exec’))” install –record /tmp/pip-7c65vb-record/install-record.txt –single-version-externally-managed –compile:
running install
running build
running build_py
creating build
creating build/lib.linux-armv7l-2.7
copying subprocess32.py -> build/lib.linux-armv7l-2.7
running build_ext
building ‘_posixsubprocess’ extension
creating build/temp.linux-armv7l-2.7
arm-linux-gnueabihf-gcc -pthread -DNDEBUG -g -fwrapv -O2 -Wall -Wstrict-prototypes -fno-strict-aliasing -D_FORTIFY_SOURCE=2 -g -fstack-protector-strong -Wformat -Werror=format-security -fPIC -I/usr/include/python2.7 -c _posixsubprocess.c -o build/temp.linux-armv7l-2.7/_posixsubprocess.o
_posixsubprocess.c:3:20: fatal error: Python.h: No such file or directory
#include “Python.h”
^
compilation terminated.
error: command ‘arm-linux-gnueabihf-gcc’ failed with exit status 1
—————————————-
Cleaning up…
Command /usr/bin/python -c “import setuptools, tokenize;__file__=’/tmp/pip-build-_4oMAc/subprocess32/setup.py’;exec(compile(getattr(tokenize, ‘open’, open)(__file__).read().replace(‘\r\n’, ‘\n’), __file__, ‘exec’))” install –record /tmp/pip-7c65vb-record/install-record.txt –single-version-externally-managed –compile failed with error code 1 in /tmp/pip-build-_4oMAc/subprocess32
Storing debug log for failure in /root/.pip/pip.log
May 27, 2017
Downloading/unpacking subprocess32
Downloading subprocess32-3.2.7.tar.gz (54kB): 54kB downloaded
Running setup.py (path:/tmp/pip-build-_4oMAc/subprocess32/setup.py) egg_info for package subprocess32
warning: no files found matching ‘*.h’
no previously-included directories found matching ‘build’
no previously-included directories found matching ‘dist’
no previously-included directories found matching ‘.hg*’
Installing collected packages: subprocess32
Running setup.py install for subprocess32
building ‘_posixsubprocess’ extension
arm-linux-gnueabihf-gcc -pthread -DNDEBUG -g -fwrapv -O2 -Wall -Wstrict-prototypes -fno-strict-aliasing -D_FORTIFY_SOURCE=2 -g -fstack-protector-strong -Wformat -Werror=format-security -fPIC -I/usr/include/python2.7 -c _posixsubprocess.c -o build/temp.linux-armv7l-2.7/_posixsubprocess.o
_posixsubprocess.c:3:20: fatal error: Python.h: No such file or directory
#include “Python.h”
^
compilation terminated.
error: command ‘arm-linux-gnueabihf-gcc’ failed with exit status 1
Complete output from command /usr/bin/python -c “import setuptools, tokenize;__file__=’/tmp/pip-build-_4oMAc/subprocess32/setup.py’;exec(compile(getattr(tokenize, ‘open’, open)(__file__).read().replace(‘\r\n’, ‘\n’), __file__, ‘exec’))” install –record /tmp/pip-7c65vb-record/install-record.txt –single-version-externally-managed –compile:
running install
running build
running build_py
creating build
creating build/lib.linux-armv7l-2.7
copying subprocess32.py -> build/lib.linux-armv7l-2.7
running build_ext
building ‘_posixsubprocess’ extension
creating build/temp.linux-armv7l-2.7
arm-linux-gnueabihf-gcc -pthread -DNDEBUG -g -fwrapv -O2 -Wall -Wstrict-prototypes -fno-strict-aliasing -D_FORTIFY_SOURCE=2 -g -fstack-protector-strong -Wformat -Werror=format-security -fPIC -I/usr/include/python2.7 -c _posixsubprocess.c -o build/temp.linux-armv7l-2.7/_posixsubprocess.o
_posixsubprocess.c:3:20: fatal error: Python.h: No such file or directory
#include “Python.h”
^
compilation terminated.
error: command ‘arm-linux-gnueabihf-gcc’ failed with exit status 1
—————————————-
Cleaning up…
Command /usr/bin/python -c “import setuptools, tokenize;__file__=’/tmp/pip-build-_4oMAc/subprocess32/setup.py’;exec(compile(getattr(tokenize, ‘open’, open)(__file__).read().replace(‘\r\n’, ‘\n’), __file__, ‘exec’))” install –record /tmp/pip-7c65vb-record/install-record.txt –single-version-externally-managed –compile failed with error code 1 in /tmp/pip-build-_4oMAc/subprocess32
Storing debug log for failure in /root/.pip/pip.log
Thanks.
May 27, 2017
What python version are you running? Python 3 seldom works and I think you have to use python 2.7 for Warberry Pi due to its dependencies…
Have you followed this install procedure? https://github.com/secgroundzero/warberry/wiki/installation
I’ve not installed Warberry Pi in a very long time but if you’re running python 2.7.n and it still fails I can try the latest version myself tomorrow and see what needs to be done in order to make it work.